Forgetting To Clean the Area
A patch placed over drywall debris, dust, or powdery paper can’t bond fully with the surface beneath it. Weak contact becomes a problem once the compound dries and shrinks. Paint won’t hide a patch that moves or flakes at the edges.
Don’t overlook cleaning the damaged spot before cutting, taping, or spreading compound. Use a dry cloth or shop vacuum to remove loose material from the hole and the surrounding wall. Once the area looks dry and free of debris, you will have a solid base to work with.
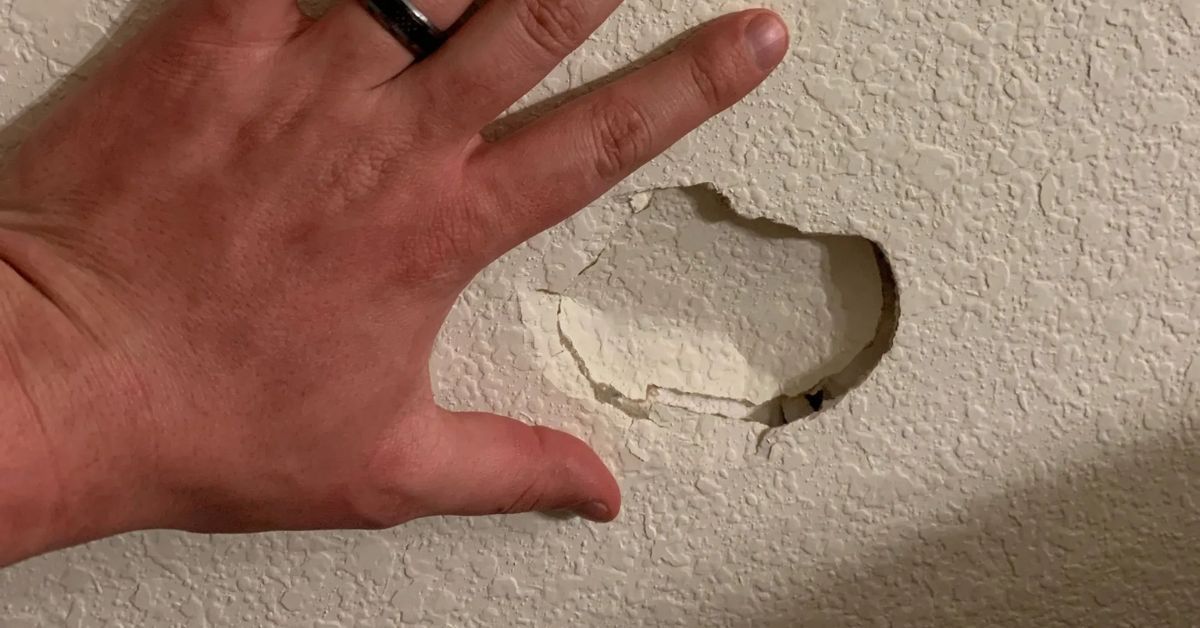
Leaving the Jagged Edges Around the Damage
Jagged edges make a drywall patch harder to set evenly. Torn paper absorbs moisture from joint compound and swells under the repair. Any crumbling gypsum causes weak points around the patch opening. When temperatures fluctuate, causing the wall to expand and contract, those frail areas develop ridges or cracks.
It’s essential to trim the damaged paper with a sharp utility knife before adding the patch. Cut loose pieces away until the surrounding drywall feels firm. Shape the opening into a neat square or rectangle when the damage allows it. A clean edge creates steady contact between the patch material and the existing wall.
Using a Small or Oversized Drywall Patch
Patch size affects strength and blending. A patch that barely covers the hole leaves damaged edges underneath the repair. Those edges may shift or crumble after the compound dries. An oversized patch creates a larger repair area than the wall actually demands.
Choose a patch that covers the damaged section and reaches stable drywall around it. The goal is enough overlap to secure the repair while limiting surface buildup. Smaller nail holes may only require compound. Large holes need a cut piece of drywall or a patch kit that matches the damage size.
Failing To Support the Patch
Without support, the patch flexes when someone touches the wall. Joint compound dries hard, although it won’t replace framing or backing. Movement behind the repair leads to cracks around the seams.
Install a wood backer strip behind larger holes before setting the drywall piece. Secure the strip to the existing wall with drywall screws, so the patch has something firm to attach to. The patch should sit flush with the wall surface once screwed into the backing. Any recessed or raised placement will affect every coat that follows.
Applying Thick Layers of the Joint Compound
Thick joint compound seems like a shortcut because it fills gaps quickly. Heavy buildup dries unevenly and shrinks as moisture leaves the material. The surface may crack or form a raised mound around the patch. Sanding that mound flat takes extra effort and may expose the tape.
Apply thin coats with a wide drywall knife. Spread the compound beyond the patch edge to taper the compound onto the wall. Use firm pressure and feather each edge so the compound thins into the painted surface. The gradual transition diminishes the shadow line around the patch. This step requires patience, but the smooth outcome is well worth the wait.
Sanding Before the Joint Compound Is Fully Dry
Rushing the sanding step damages the repair before it has strength. Damp compound clogs sandpaper and tears away from the patch. The surface may form dents under light pressure, showing through primer and paint once light hits the wall.
Let each coat dry fully. Keep in mind that humidity and air temperature may expedite or slow down the drying process. You’ll know that the compound is dry when it feels firm and sands into fine powder. If the surface gums up under the sanding block, wait a little longer before continuing.
Choosing Texture Products and Techniques That Don’t Match
Every wall has a specific texture. When trying to patch drywall damage yourself, you have to figure out how to texture match. Otherwise, the repair will become an obvious error.
Texture matching depends on the product and the technique. Some small repairs work with aerosol texture spray. Other patches need thinned joint compound, a roller, or a drywall knife to recreate the existing pattern.
The wrong product changes the size and shape of the texture. Choosing an incorrect technique changes how thick the texture sits on the wall. Either problem makes the patched area stand apart after primer and paint. Matching both parts gives the repair a better chance of blending into the surrounding surface.
Using the Wrong Tools for the Project
The tools you use matter just as much as the patching technique. A flexible knife with a damaged edge drags lines through the compound. Use a drywall knife wide enough to spread compound past the patch edge. A six-inch knife works well during early coats on many small repairs, but a 10-inch knife is ideal for wide feathering.
A sanding sponge or sanding block offers better control than folded sandpaper. Loose sandpaper bends around high spots and can dig into soft compound before the surface is even. With the sanding sponge or block, gouges and bumpy surfaces are less likely because of the even hand pressure. Be sure to use a 150- to 220-grit sanding tool for smooth sanding that won’t tear through the patch.